

How To Repair Hp Pavilion Dv7
Z7_3054ICK0KGTE30AQO5O3KA30N0
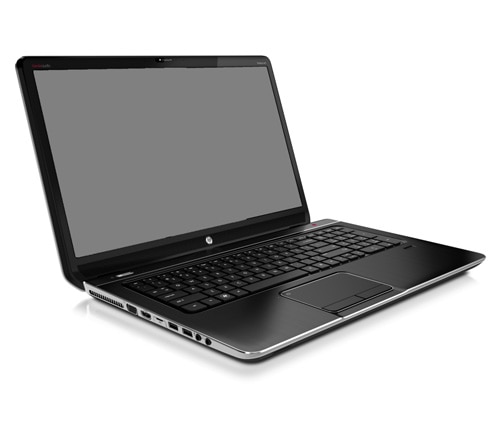
Removing and Replacing the Keyboard for HP Pavilion dv7-7000, dv7-7100 and HP ENVY dv7-7200, dv-7300 Notebook PCs
This document applies to HP Pavilion dv7-7x00 Series Entertainment and HP ENVY dv7-7x00 series notebook computers.
Before you begin
-
You need a Phillips head screwdriver.
-
Turn off the reckoner. Disconnect the Ethernet or modem cable. Disconnect the power cord.
-
Transfer the computer to a articulate, flat, stable work surface over a non-carpeted floor.
-
HP strongly recommends the use of an anti-static wrist strap and a conductive foam pad when working on the computer.
-
Do not remove a component from its protective packaging until yous are fix to install it.
alert:The edges of metal panels can cutting skin. Be conscientious not to slide skin along any interior metal edge of the computer.
warning:Earlier starting, power off the computer and wait for components to cool earlier starting these procedures.
caution:This product contains components that tin can be damaged by electrostatic discharge (ESD). To reduce the chance of ESD damage, piece of work over a non-carpeted floor, use a static dissipative piece of work surface (such equally a conductive foam pad), and vesture an ESD wrist strap connected to a grounded surface.
Video overview
View the following video before using the steps in this article.

Removing the keyboard
warning:Make certain the computer is disconnected from ability earlier starting.
Follow the steps in this department to remove the keyboard.
| Step 1 Remove the bombardment. For more data near removing the battery, refer to the HP support certificate Removing and Replacing the Battery. | |
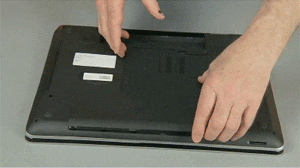
| Footstep two Remove the service door. For more information about removing the service door, refer to the HP support document Removing and Replacing the Service Door. | |
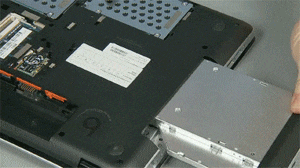
| Stride three Remove the CD/DVD drive. For more data about removing the CD/DVD drive, refer to the HP back up document Removing and Replacing the CD or DVD Drive. | |
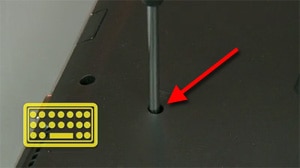
| Pace four Remove the Phillips head screw (identified with a keyboard icon) that secures the keyboard to the computer. Save the screw for keyboard replacement. | |
| Step 5 Open the display panel and position the computer for easy admission to the CD/DVD drive. | |
| Step 6 Gently poke through the pigsty with your finger to release the keyboard. | |
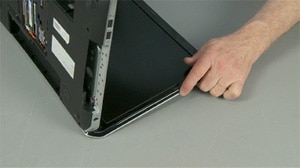
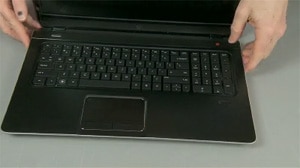
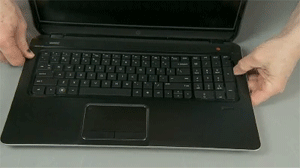
| Step 7 Turn the notebook correct side up and open up all the way. | |
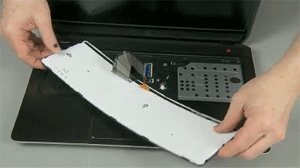
| Step 8 Using your finger or a flat bladed non-marring tool, gently lift up the rear edge of the keyboard and slide the keyboard towards the rear of the notebook to release the tabs at the front of the keyboard. notation: | |
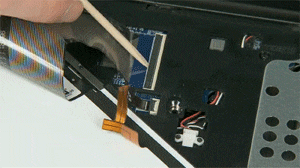
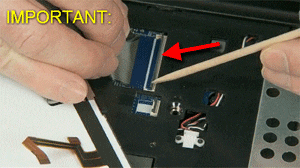
| Pace ix Gently lift the locking bar on the keyboard ZIF connector and remove the keyboard ribbon cablevision. circumspection: note: | |
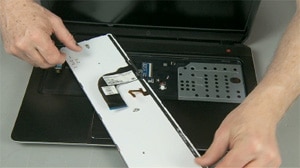
| Step 10 Remove the keyboard. | |


Replacing the keyboard
Use the steps in this section to supervene upon the keyboard.
| Stride 1 Position the keyboard upside down and so you have access to the ribbon cablevision and the connector. | |
| Step 2 Insert the keyboard ribbon cable into the ZIF connector. caution: | |
| Stride 3 Push button the locking bar downward to secure the ribbon cable in the connector. note: | |
| Step iv Plow the keyboard over and identify the tabs on the bottom border of the keyboard into the top cover | |
| Step 5 Printing the keyboard downward and press forth the edges of the keyboard to secure it to the notebook. | |
| Step 6 Close the display panel, turn the notebook upside down, and replace the screw that secures the keyboard to the base. | |
| Footstep seven Supplant the CD/DVD drive. For more information well-nigh replacing the CD/DVD drive, refer to the HP support document Removing and Replacing the CD or DVD Drive. | |
| Step 8 Supercede the service door. For more information about replacing the service door, refer to the HP support document Removing and Replacing the Service Door. | |
| Step 9 Replace the battery. For more than information about replacing the battery, refer to the HP support document Removing and Replacing the Battery. | |


Source: https://support.hp.com/nz-en/document/c03584185
Posted by: adelmananympalee.blogspot.com
0 Response to "How To Repair Hp Pavilion Dv7"
Post a Comment